Connecting DBeaver to the Analytics account
Only follow this guide on a laptop issued and managed by Hackney Council. Do not set it up on a personal device.
When you run a query in DBeaver, the results are downloaded to your device. They no longer stay inside AWS. This includes any personal or sensitive data in the results. Handle query results in line with Hackney's data protection and information security policies. Do not copy or export them to personal storage.
Objective
Query data in the Analytics account from DBeaver, a desktop SQL client, rather than the Athena query editor in the AWS console.
Intended audience
- Data Analyst
Before you start
You need:
- Access to the Analytics account. When you can see the Analytics account in the AWS access portal, you have access. If you cannot see it, ask the Data Platform team.
- Your team's Athena workgroup name. It is
dap-followed by your team name, for exampledap-data-insightordap-nec-housing. - Permission to install software on your laptop, or help from IT to install it.
How it works
DBeaver does not log in to AWS itself. Instead, you set up an AWS profile on your laptop. The profile records which AWS account and role to use. You log in through the AWS CLI, and DBeaver uses that login when it runs queries.
You do steps 1 to 4 once. After that, you only need to log in again when your session expires (see Day-to-day use).
1. Install the AWS CLI
The AWS CLI is a command-line tool from AWS. You use it to create the profile and to log in.
-
Download the AWS CLI version 2 installer for your operating system from the AWS CLI install page.
- Windows: download and run the
.msiinstaller. - macOS: download and run the
.pkginstaller.
- Windows: download and run the
-
Open a new terminal window.
- Windows: open the Start menu, type
PowerShelland open Windows PowerShell. - macOS: open Terminal from Applications > Utilities.
- Windows: open the Start menu, type
-
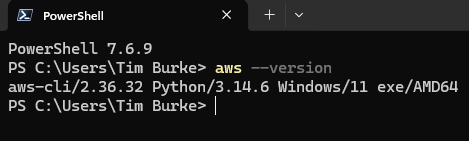
Check that the CLI is installed:
aws --versionYou should see a version that starts with
aws-cli/2.
2. Find your account and role in the AWS access portal
- Log in to your Hackney Google account in your browser.
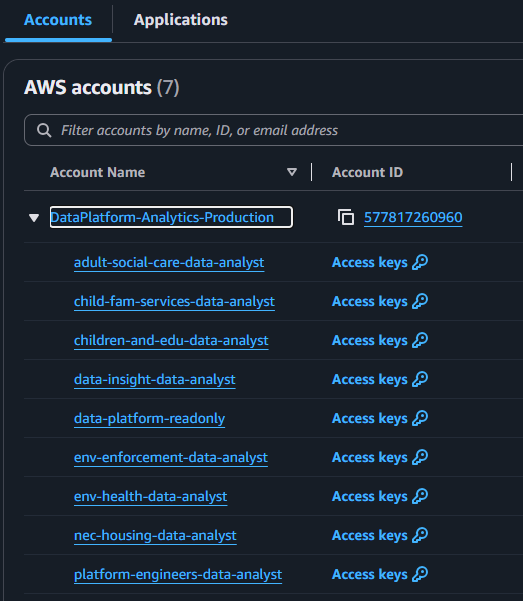
- Open the AWS access portal.
- Expand the Analytics account (account ID
577817260960). - Note the name of the role listed under it, for example
data-insight-data-analyst. You will choose this role in the next step.
3. Create the AWS profile
-
In your terminal, run:
aws configure sso -
Answer each question as follows. Press Enter after each answer.
Question Answer SSO session name (Recommended)hackneySSO start URL [None]https://hackney.awsapps.com/startSSO region [None]eu-west-1SSO registration scopes [sso:account:access]Press Enter to accept the default -
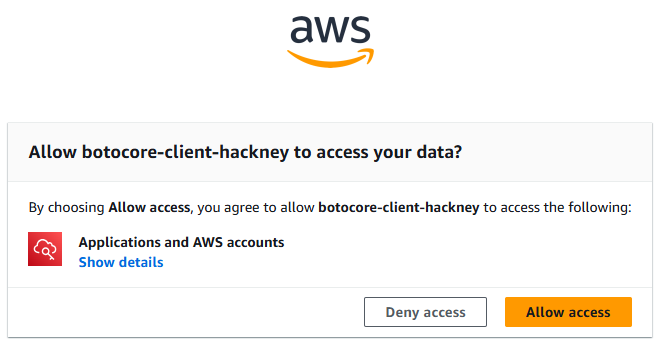
Your browser opens and asks you to allow the AWS CLI to access your data. Select Allow access.
-
Go back to the terminal. If you have access to more than one account, the CLI lists them. Use the arrow keys to select the Analytics account (
577817260960) and press Enter. -
If you have more than one role in that account, select your team role, for example
data-insight-data-analyst. -
Answer the remaining questions:
Question Answer Default client Region [None]eu-west-2CLI default output format [None]jsonProfile nameanalyticsor some other descriptive name -
Check that the profile works:
aws sts get-caller-identity --profile analyticsThe output includes
"Account": "577817260960"and your role name in theARNvalue.
The CLI saves the profile in a file called config:
- Windows:
C:\Users\<your username>\.aws\config - macOS:
~/.aws/config
It looks like this. Your sso_role_name will match your team.
[profile analytics]
sso_session = hackney
sso_account_id = 577817260960
sso_role_name = data-insight-data-analyst
region = eu-west-2
output = json

[sso-session hackney]
sso_start_url = https://hackney.awsapps.com/start
sso_region = eu-west-1
sso_registration_scopes = sso:account:access
If you prefer, you can create this file in a text editor instead of running aws configure sso. Then run aws sso login --profile analytics to log in.
4. Set up DBeaver
Download and install DBeaver Community if you do not have it.
Why not use the Athena connection type?
The Analytics account's team workgroups store query results in Athena managed storage, not in an S3 bucket that you choose. DBeaver's built-in Athena connection type expects you to give it an S3 results location, and fails without one. To get around this, you copy the Athena driver and use it as a generic JDBC driver. It is still the official AWS Athena JDBC driver, but DBeaver no longer asks for a results location.
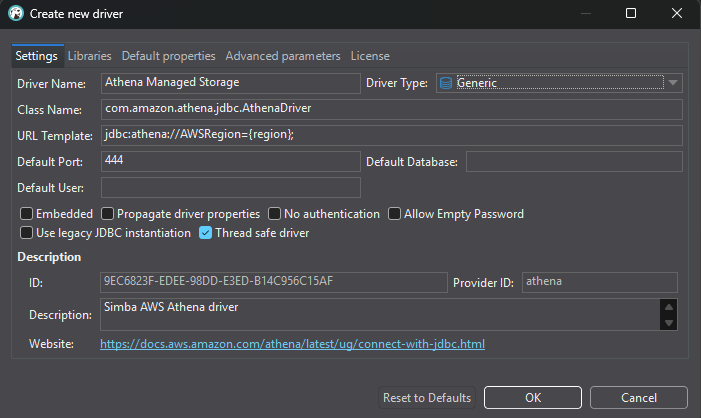
Create the driver
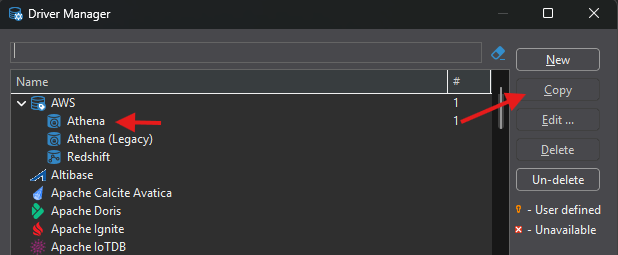
- In DBeaver, select Database > Driver Manager.
- Select Athena in the list, then select Copy.
 3. In the driver settings:
- Set Driver Name to
Athena Managed Storage. - Set Driver Type to Generic.
- Leave the other settings and the Libraries tab as they are.
- Select OK, then close the Driver Manager.
Create the connection
-
Select Database > New Database Connection.
-
Search for
Athena Managed Storage, select it, then select Next. -
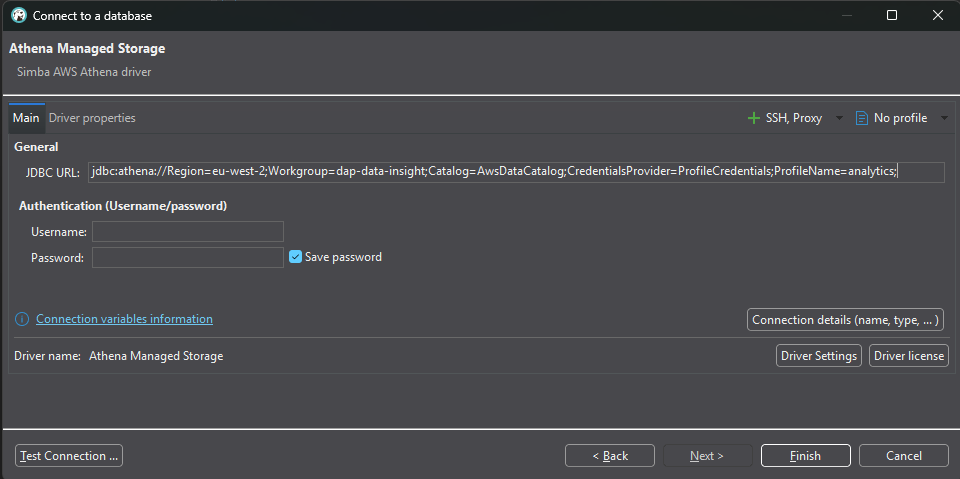
In JDBC URL, enter the following. Replace
dap-data-insightwith your team's workgroup and if you set your profile name to a value other thananalyticswhen setting up your AWS profile then that value also needs to be replaced.jdbc:athena://Region=eu-west-2;Workgroup=dap-data-insight;Catalog=AwsDataCatalog;CredentialsProvider=ProfileCredentials;ProfileName=analytics; -
Leave Username and Password empty.
- Select Test Connection. If DBeaver asks to download driver files, select Download.
- When the test succeeds, select Finish.
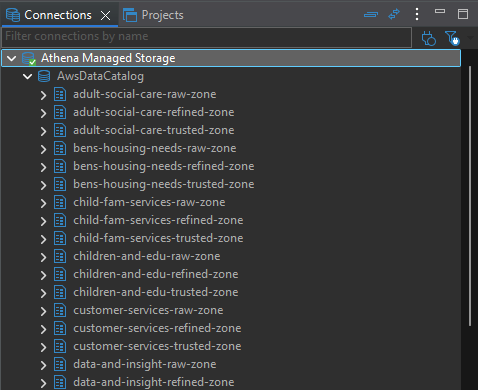
The connection appears in the Database Navigator. Expand it to see the databases you have access to.
5. Run a query
-
Right-click the connection and select SQL Editor > Open SQL script.
-
Enter a query, for example:
SELECT * FROM "<database name>"."<table name>" LIMIT 10; -
Press Ctrl+Enter (Cmd+Enter on macOS) to run it.
Day-to-day use
Your AWS login expires after a few hours. When it expires, DBeaver shows an error about expired or missing credentials. To log in again:
-
Open a terminal and run:
aws sso login --profile analytics <or the profile name you chose> -
Select Allow in the browser.
-
In DBeaver, right-click the connection and select Invalidate/Reconnect.
Troubleshooting
| Problem | What to do |
|---|---|
aws is not recognised | Close and reopen your terminal after installing the AWS CLI. If it still fails, restart your laptop. |
The Analytics account is not listed in aws configure sso | Check that you can see it in the AWS access portal. If you cannot, ask the Data Analytics Platform team for access. |
| DBeaver says the token has expired or the profile cannot be loaded | Run aws sso login --profile analytics, then reconnect in DBeaver. |
| DBeaver asks for an S3 output location | You are using the built-in Athena connection type. Create the connection with the Athena Managed Storage driver instead. |
| Access denied on the workgroup | Check the Workgroup value in the JDBC URL matches your team's workgroup. Your role can only use its own team's workgroup. |
| You cannot see a database or table | Your team does not have access to it. Ask the Data Analytics Platform team. |