Deploying a job in Glue
In this module, you will move the data transformation script you created Sagemaker (from Transforming data to refined zone using Sagemaker) into a Glue job and then ‘productionise’ it.
Overview
First you will test the script within the Glue console like you did in the training module Ingesting data from Google Sheets.
Once this job runs successfully, you will then set up the job formally by writing a Terraform module.
This will replicate a common task within the Data Platform, where data from the raw zone is transformed and written into the refined zone, usually on a schedule. We use Terraform to productionise jobs for a number of reasons:
When deployed, Terraform will generate all the necessary infrastructure in the AWS environment (job, crawler, scheduler)
Using Terraform (Infrastructure as Code)
This will replace the elements you’ve created manually in the AWS console in the second part of Module 2. This is called ‘Infrastructure as Code’ (IaC) and brings a lot of advantages to the Data Platform:
- Quality assurance: we use Terraform templates so all elements of infrastructure follow the same standards
- Repeatability: your job can be recreated by a simple redeployment if anything goes wrong. It can also be replicated to another environment, for instance from Staging to Production. Be aware that any changes made to your Glue job directly within the Glue console will be overwritten when the Terraform next deploys.
Using GitHub
Both the PySpark script and the job details in Terraform will become part of the Data Platform code base and saved in GitHub. This also brings advantages:
-
Safety: Your code cannot be accidentally lost and is each version of your code is 'saved', also known as version-control. This means that code can be rolled back if necessary.
-
Quality assurance: Your code will be reviewed by at least two Data Platform developers. GitHub will also perform automated checks which verify certain criteria , and therefore must pass before being allowed to merge into the repository
Pre-requisites
Please ensure that the modules Getting started, Ingesting data from Google Sheets and Transforming data to refined zone using Amazon Sagemaker are completed before proceeding.
Part 1. Prototyping the job in the AWS Glue console
You’ll take the following steps before productionising the script you wrote in the Transforming data to refined zone using Amazon Sagemaker module, to check it runs smoothly as a job in the AWS Glue environment; we expect it will as the notebook environment within SageMaker also runs within the same Glue environment). It will be an opportunity for you to try logging. As we’re just testing, we won’t write any Terraform (we'll do this in the second half of this module) and we won’t schedule the job. We’ll also delete our job at the end. If you need more detailed instructions at any point checkout the guide to set up an ETL job.
-
Login to AWS pre-production account via the Hackney SSO.
-
Set up a new job in Glue Studio.
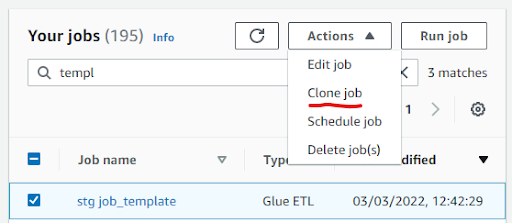
- Go to AWS Glue Studio and open the template job, called "stg job_template" (To make it easier to get started, this template has some of the script layout formatted, and job parameters specified already).
- Clone the job (from Actions) and rename it with your name and remove "stg" from the prefix, for example "joe bloggs template".
- Open the job and familiarise yourself with the steps (reading, transforming and writing data) and note the differences compared to the Notebook template.
- Write your Glue job.
-
In a different tab, open Sagemaker and navigate to the notebook you created in Module 2.
-
Paste your code from the notebook into the template, ignoring the first cell (Cells can be merged in Jupyter by holding
Shiftand selecting the cells, then pressingShift+Mon your keyboard). -
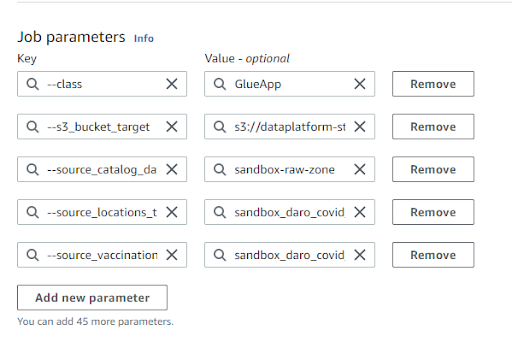
For the variables defined in the first cell of your notebook, you will use the
Job detailstab instead of writing them in the script. You should define them in the Job parameters panel which can be found underAdvanced properties. You should also update the S3 path in the Script path field tos3://dataplatform-stg-glue-scripts/custom/.
-
- Run your job.
- Review the run result logs. See the monitoring section of the using Glue Studio guide for an explanation on how to do this.
- Once your job status has changed from
RunningtoSucceededyou should check the data wrote correctly into S3. To do this, follow the same steps in the last section of Module 1. - Crawl the results. (Using the crawler named “sandbox-refined-zone”).
- Check the data in Athena - (playbook).
Congratulations, you've tested that your transformation is working in Glue. You can move to the next part of this Module.
2. Part 2: Deploying your job via Terraform
In this second part of Module 3, you will ‘productionize’ the job you’ve tested in the previous part. To do this, you will write a Terraform module in the Data Platform GitHub repository, and then deploy it. The entirety of this module will be carried out in the GitHub User Interface (GUI), but you could also work in your local development environment such as PyCharm or VSCode if you prefer.
Overview of the steps for part 2:
- First, you’ll delete the data you have just created in part 1 as the Terraform you are about to write will replicate the process, but in an automated way.
- Then, you will save your PySpark script in the relevant location of the Data Platform GitHub repository. The code will be the same as what you have used within the script part of the Glue job creation.
- Next, you will write a Module in Terraform that encapsulates all the resources your Glue job requires.
- You will then create a Pull Request and merge your code with the pre-production Data Platform repository
- At this point, GitHub will attempt to deploy your code, and your job will get created in AWS.
- You will be able to retrieve your Glue job in the AWS console, to run it, and check the results in Athena.
Detailed steps for part 2:
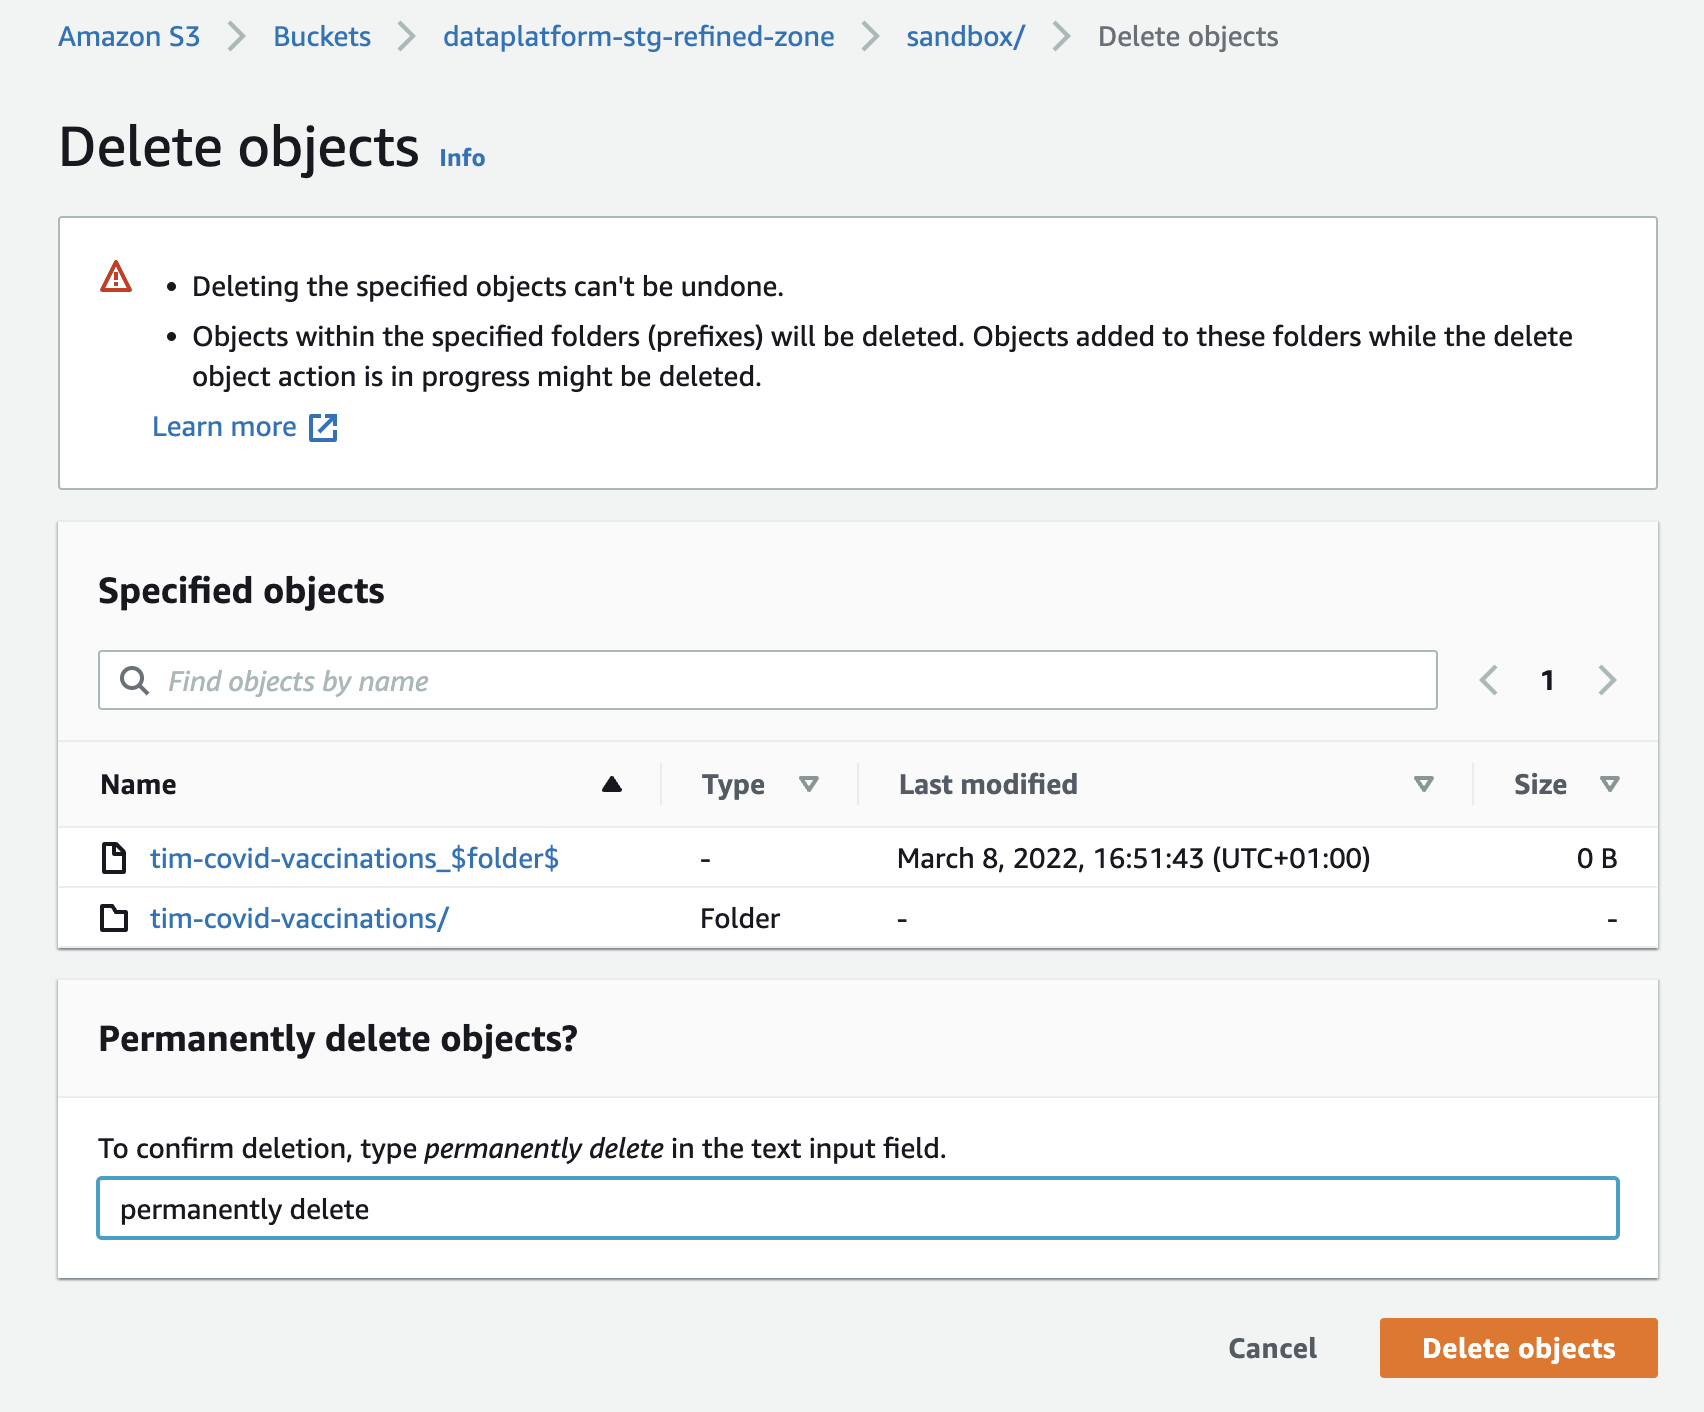
- Delete the data generated in Part 1 of this module.
This is so that we can check that the job deployed through the Terraform that you are about to write, actually works. To delete your data, navigate to it in S3 (Refined zone bucket, Sandbox department) and permanently delete the two full folders with your name (there should be one folder for Locations and one for Vaccinations). Do NOT delete your data from the Raw zone, otherwise you would have to ingest it again by running the ingestion job created in Ingesting data from Google Sheets!
- Create and add your PySpark script to the GitHub repository.
This step can be done via GitHub website, or in your local IDE (in the latter case make sure you have pulled the latest version of the Data Platform repository from the main branch).
- Navigate to the Jobs directory in the Data Platform Project and open your department folder.
- Click Add file and then Create new file.
- Name your file. This should be the same name you gave your job in Glue Studio. Ensure the file name only contains lowercase letters, that words are separated by underscores, and that the file has the extension .py at the end. Add your name at the end of the file name. An example is covid_vaccinations_joe_bloggs.py. Remember the name you have given your script as you will need it for the following section.
- If your Glue job was created using Glue Studio, open your Glue job and copy the Python script by navigating to the Script tab.
- Navigate back to the new script file you created in the GitHub interface (or existing script file, if you are updating your script), and paste in your script.
- When you validate your new file in GitHub, do not create a Pull Request straight away as we also need to write the Terraform module. Look at the name of the new branch you are creating. You'll use the same branch in the next step and raise one single PR at the end
More information about using GitHub is in the Using GitHub Playbook article.
- Define your job in a Terraform module.
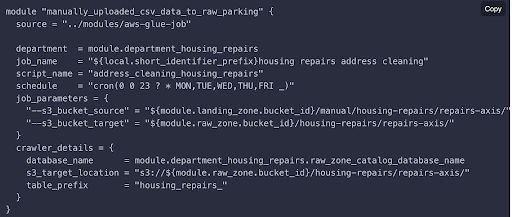
A module is a block of Terraform code that creates a set of related resources in our Amazon Web Services account. The Data Platform team has created a module template for Glue jobs. An example from the Playbook is reproduced below. As you can see, it includes:
- The job name and department
- The location of the PySpark script
- The schedule of the job
- The job parameters (this is the same as what you defined manually in Job details in the Glue console)
- A crawler to crawl the results of your job so that data is available to view in a tabular format in the Glue data catalogue (rather than as a set of parquet files in S3)
You’ll create your module in the existing file: terraform/core/40-aws-glue-job-sandbox.tf. This link takes you to the main branch of the repository, but you should make sure you switch to the branch you were using to develop the Pythin script in the previous step.
To create your module, follow the steps from the [Playbook, Part 2][job module in playbook].
⚠️ Please ensure that you add your name at the end of the module name and the job name so that it can be distinguished from other modules and jobs that other users have created as part of this training.
⚠️ Please do not add a schedule to your module, you’ll just run it manually later.
⚠️ The example above does not contain all the mandatory fields… make sure you read the Playbook guidance above carefully so that you don’t forget any! If you do, GitHub won't let you commit your work.
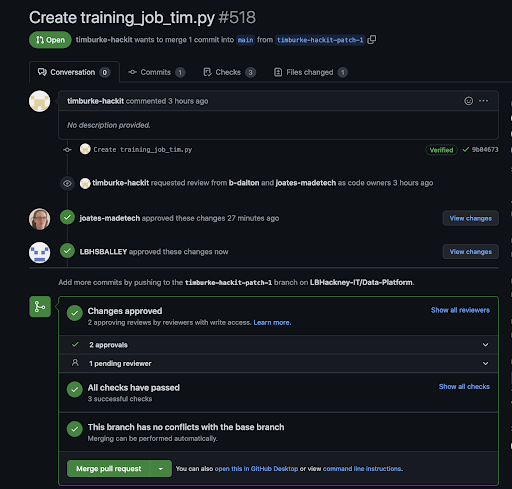
- Raise a Pull Request so that your code can be reviewed.
Commit your code to your current working branch and then open a Pull Request. This Pull Request will contain your new Python script and your new Terraform module.
- Deploy to the Data Platform.
When you have received two approvals from reviewers, go back to GitHub. You will now be able to merge your branch (the merge button is green).
The automated deployment will now start and make take up to an hour to complete. To check how it is going, you can navigate to the Actions tab and monitor the progress of your code deployment.
A common reason for a deployment failure is when a resource declared in Terraform (for instance a pySpark script file) is missing from the AWS environment. If this is happening, make sure all the necessary resources have been deployed before re-trying to deploy yours.
- Check your new resources in the AWS console.
In the Glue Studio page, you should find your Glue job with the prefix “stg-” included. In the Glue Crawlers page, you should find the associated crawler. You can easily link the details of these new resources to the statements you wrote in the Terraform module.
- Run the deployed job.
You can now run your job manually from Glue Studio. After it has completed, the job will trigger the crawler so you don’t need to run it yourself. If you navigate to the Crawler page, you should see your crawler in the ‘running’ state.
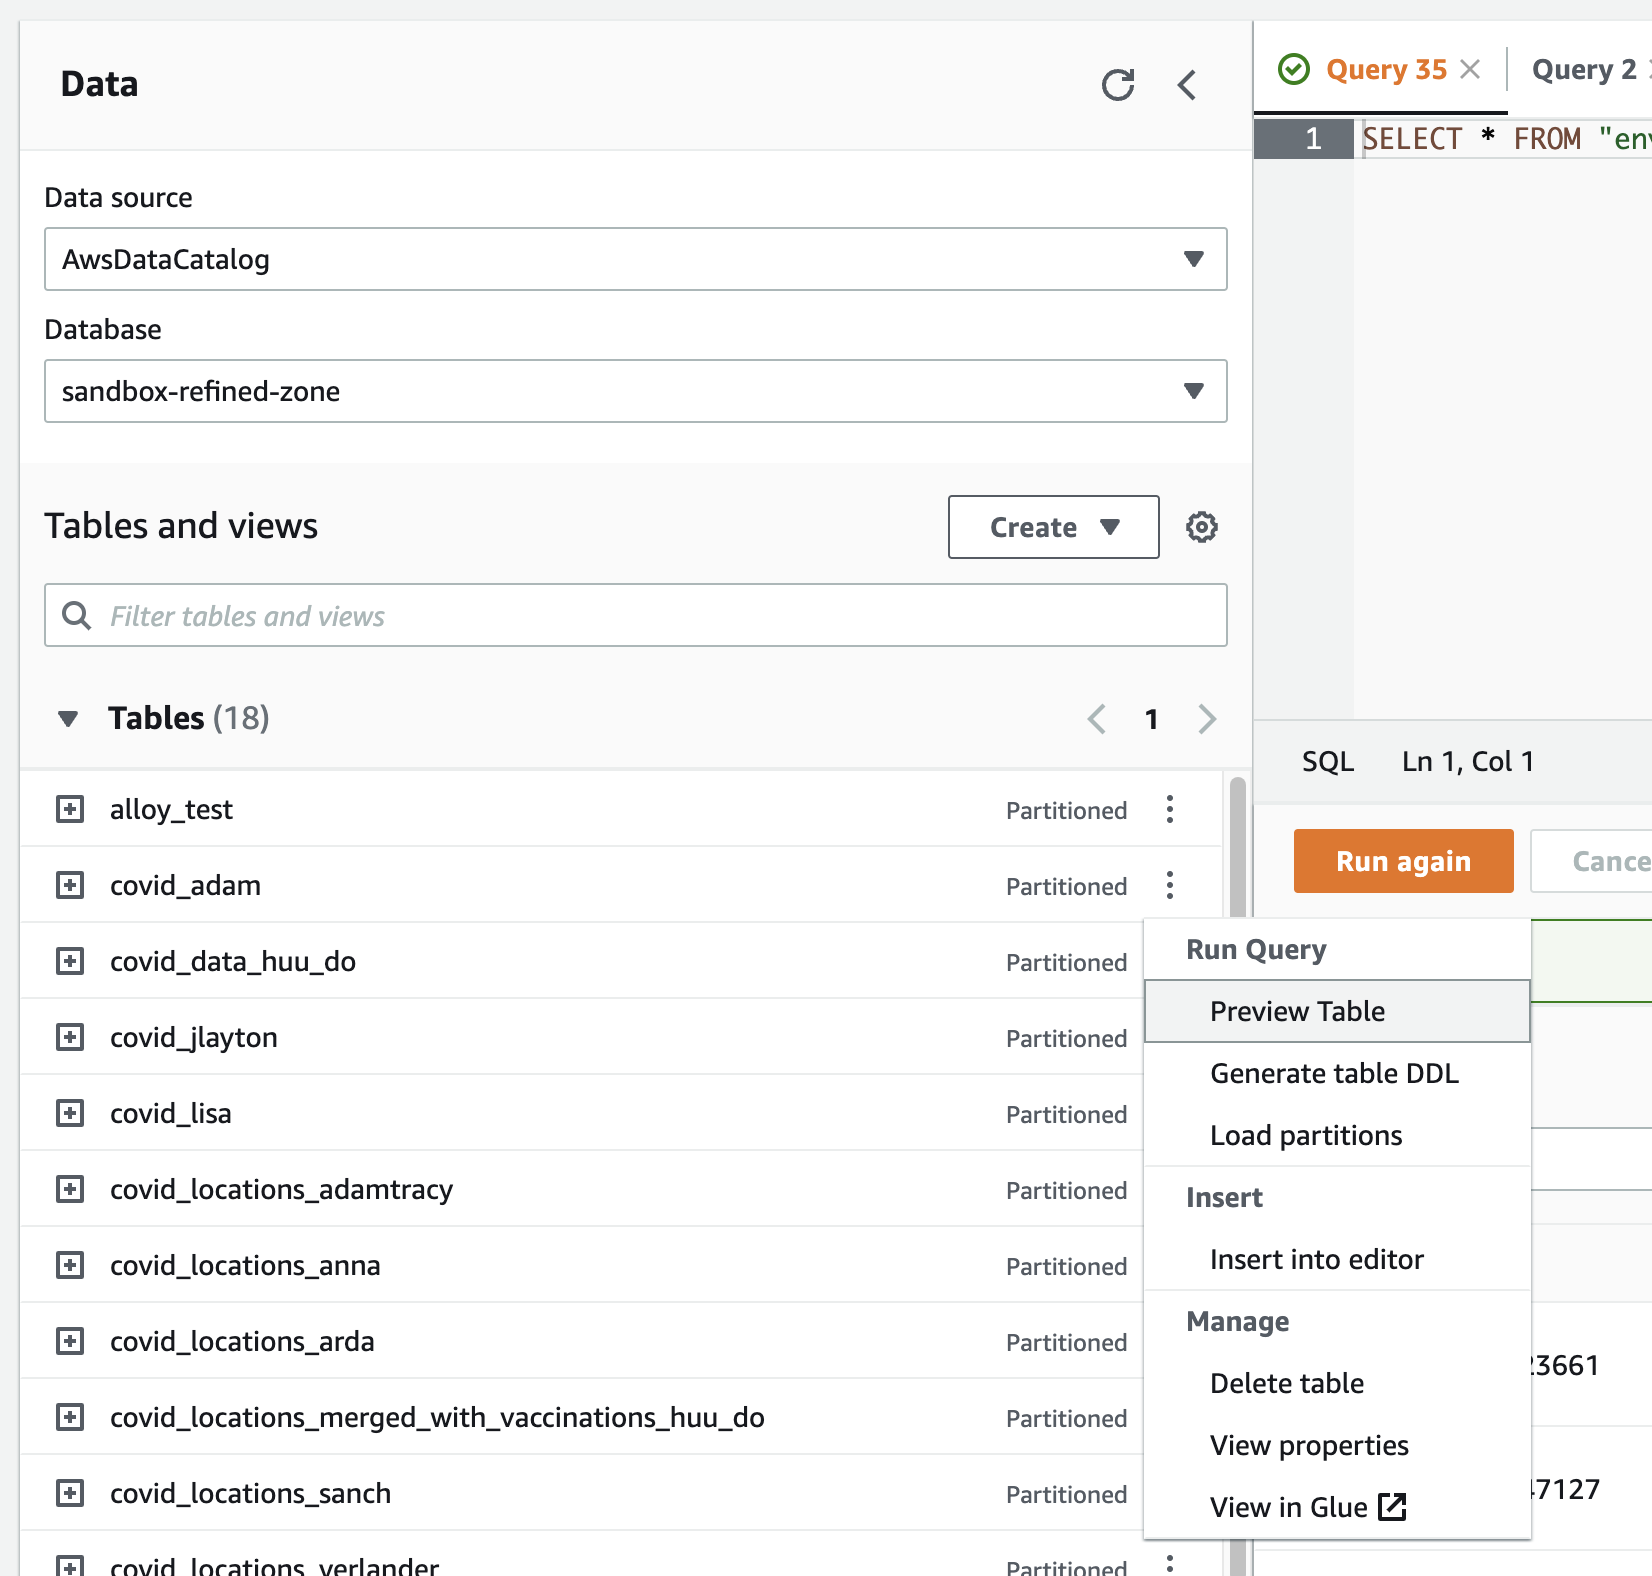
- Check the resulting data in Athena - the interface to view and query data from the Glue Catalogue.
- Open the Query editor
- Make sure workgroup is “sandbox” and you’re using the “sandbox-raw-zone” database

- Run a simple query in Athena against your tables (created/ updated) by the Crawlers. A simple way to do this is to select the 3 vertical dots by the table name and select “Preview Table” to see the top 10 lines. (The dialect of SQL used in Athena is Presto SQL)
- Delete the job prototype you've created manually in the Glue console in the Part 1 of this training module.
If the deployed job has worked successfully, you can safely delete the one you created manually earlier as you won't need to reload the data again - your code is now in the Data Platform codebase!
🎉 Congratulations, you've completed this module and deployed a job in the Data Platform!